GPT-powered music search engine on a local voice assistant

Today I am going to explain to you how to build this:
Ok fine! I am going to explain to you how to build this:
A way to play music, on a wide variety of speakers in your home, by voice, coupled with a very powerful search engine. Something that does not only match a song name or an album name, but also more complex queries, as you saw in the two videos above.
This blog post will assume a few prerequisites if you wish to follow along:
- You need to be using Home Assistant. (Get started here)
- You need to have a voice assistant configured on Home Assistant. (Follow our guides here).
- You need an OpenAi API Key (Note: It costs money ... But it is dirt cheap, less than 1$/month even with all my extensive testing)
Excluding the prerequisites above, there are two main "blocks" that we need to cover in order to build our powerful search engine:
- Music Assistant
- OpenAI GPT
Music Assistant
Music Assistant is the perfect music companion for all Home Assistant users. It allows you on the one hand to gather all your music in a single place, whether it is located on streaming services or stored locally. And on the other hand, it allows you to stream it to almost any speaker (or group of speakers) compatible with Home Assistant.
Music Assistant is still in beta, so the installation is currently not straightforward. But I am going to guide you nevertheless.
The Music Assistant server
The first brick you need to install is the Music Assistant Server. It's an add-on available on a custom repository. Fortunately, we are thinking about convenience when we manage such a distributed product so we have some helpers to guide you, even for complex tasks like this.
Click here to add the custom repository:

And then click here to install Music Assistant:

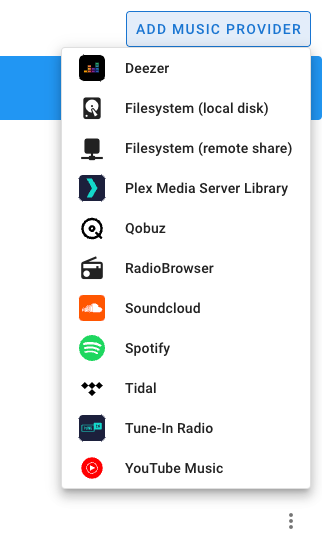
When the add-on is started, you'll be able to add your music under Settings > Providers
And you'll be able to configure the auto-discovered speakers under Settings > Players

Even without going further on this blog post, Music Assistant, as a standalone product, is a great way to play music coming from different sources in different players in your house. You can even create groups of speakers from different brands, which is unprecedented in a music app.
The Music Assistant Integration
Even if Music Assistant is cool as a standalone product, now we're going to sprinkle some automation magic on top of it. And the first step is to integrate it into Home Assistant.
A Music Assistant integration exists on the Community Store, you can install it by clicking here:

Once installed, you should be able to integrate the players you created on Music Assistant (Groups or not) into Home Assistant

The Music Assistant Services
Since the last version of the Music Assistant integration, Music Assistant provides some very interesting services with great potential. It is actually the release of these services that sparked the whole idea of the smart music search engine voice assistant.
To put it simply, the service mass.play_media allows you to play music by describing it like you would on Spotify or Tidal: With an artist name, an album name, or a track name.
Here is how you play a track on an album of an artist:
service: mass.play_media
data:
  media_id: Hells Bells
  media_type: track
  artist: AC/DC
  album: Back in Black
target:
  entity_id: media_player.music_assistant_bureau_sonos
Here is how you play a complete album
service: mass.play_media
data:
  media_id: Back in Black
  media_type: album
  artist: AC/DC
target:
  entity_id: media_player.music_assistant_bureau_sonos
And here is how you play a complete artist
service: mass.play_media
data:
  media_id: AC/DC
  media_type: artist
target:
  entity_id: media_player.music_assistant_bureau_sonos
And that concludes the first "building block". You can now play any music you want on any speaker you want in your house with just a track name or an artist name.
Let's now dive into the second block, which is the voice commands
Voice Commands, and OpenAI to the rescue
2023 is (or was depending on when you read this blog post) the Year of the Voice for Home Assistant.
We shipped some pretty cool things such as the ability to repurpose almost any object into a voice assistant.
Really anything ... 🙈
The great thing about our voice assistant product is that it is fully customizable.
- You can change the wake word it reacts to
- You can change the language that you speak
- You can change the voice used to reply
- You can even create your own sentences and how Home Assistant would react to these.
This last customization point is exactly what we are going to do for that project. We are going to create a custom sentence that catches a "playing intent", and sends it to Music Assistant using the service we saw in the above section (mass.play_media)
A custom "intent" is composed of 3 main parts:
- The input sentence that will trigger it
- The list of actions that need to be executed once triggered
- The response needed to be sent back to the voice assistant
In order to provide more flexibility in the input sentences, Home Assistant provides a way to describe "free text" called wildcard variables. For example: What's the weather like in {location}? and we are able to get the content of our wildcard variables in the actions and so use them.
At first, I tried to create my search intent(s) "the old-fashioned way" by trying to match every possible use case:
- A track by an unknown artist
play {track} - An artist
play {artist} - An album by an unknown artist
play {album} - A track by an artist
play {track} by {artist} - An album by an artist
play the album {album) by {artist} - A track in an album by an artist
play {track} in album {album} by {artist}
However, I faced lots of issues with intent matching and it became quite big and difficult to maintain quite fast.
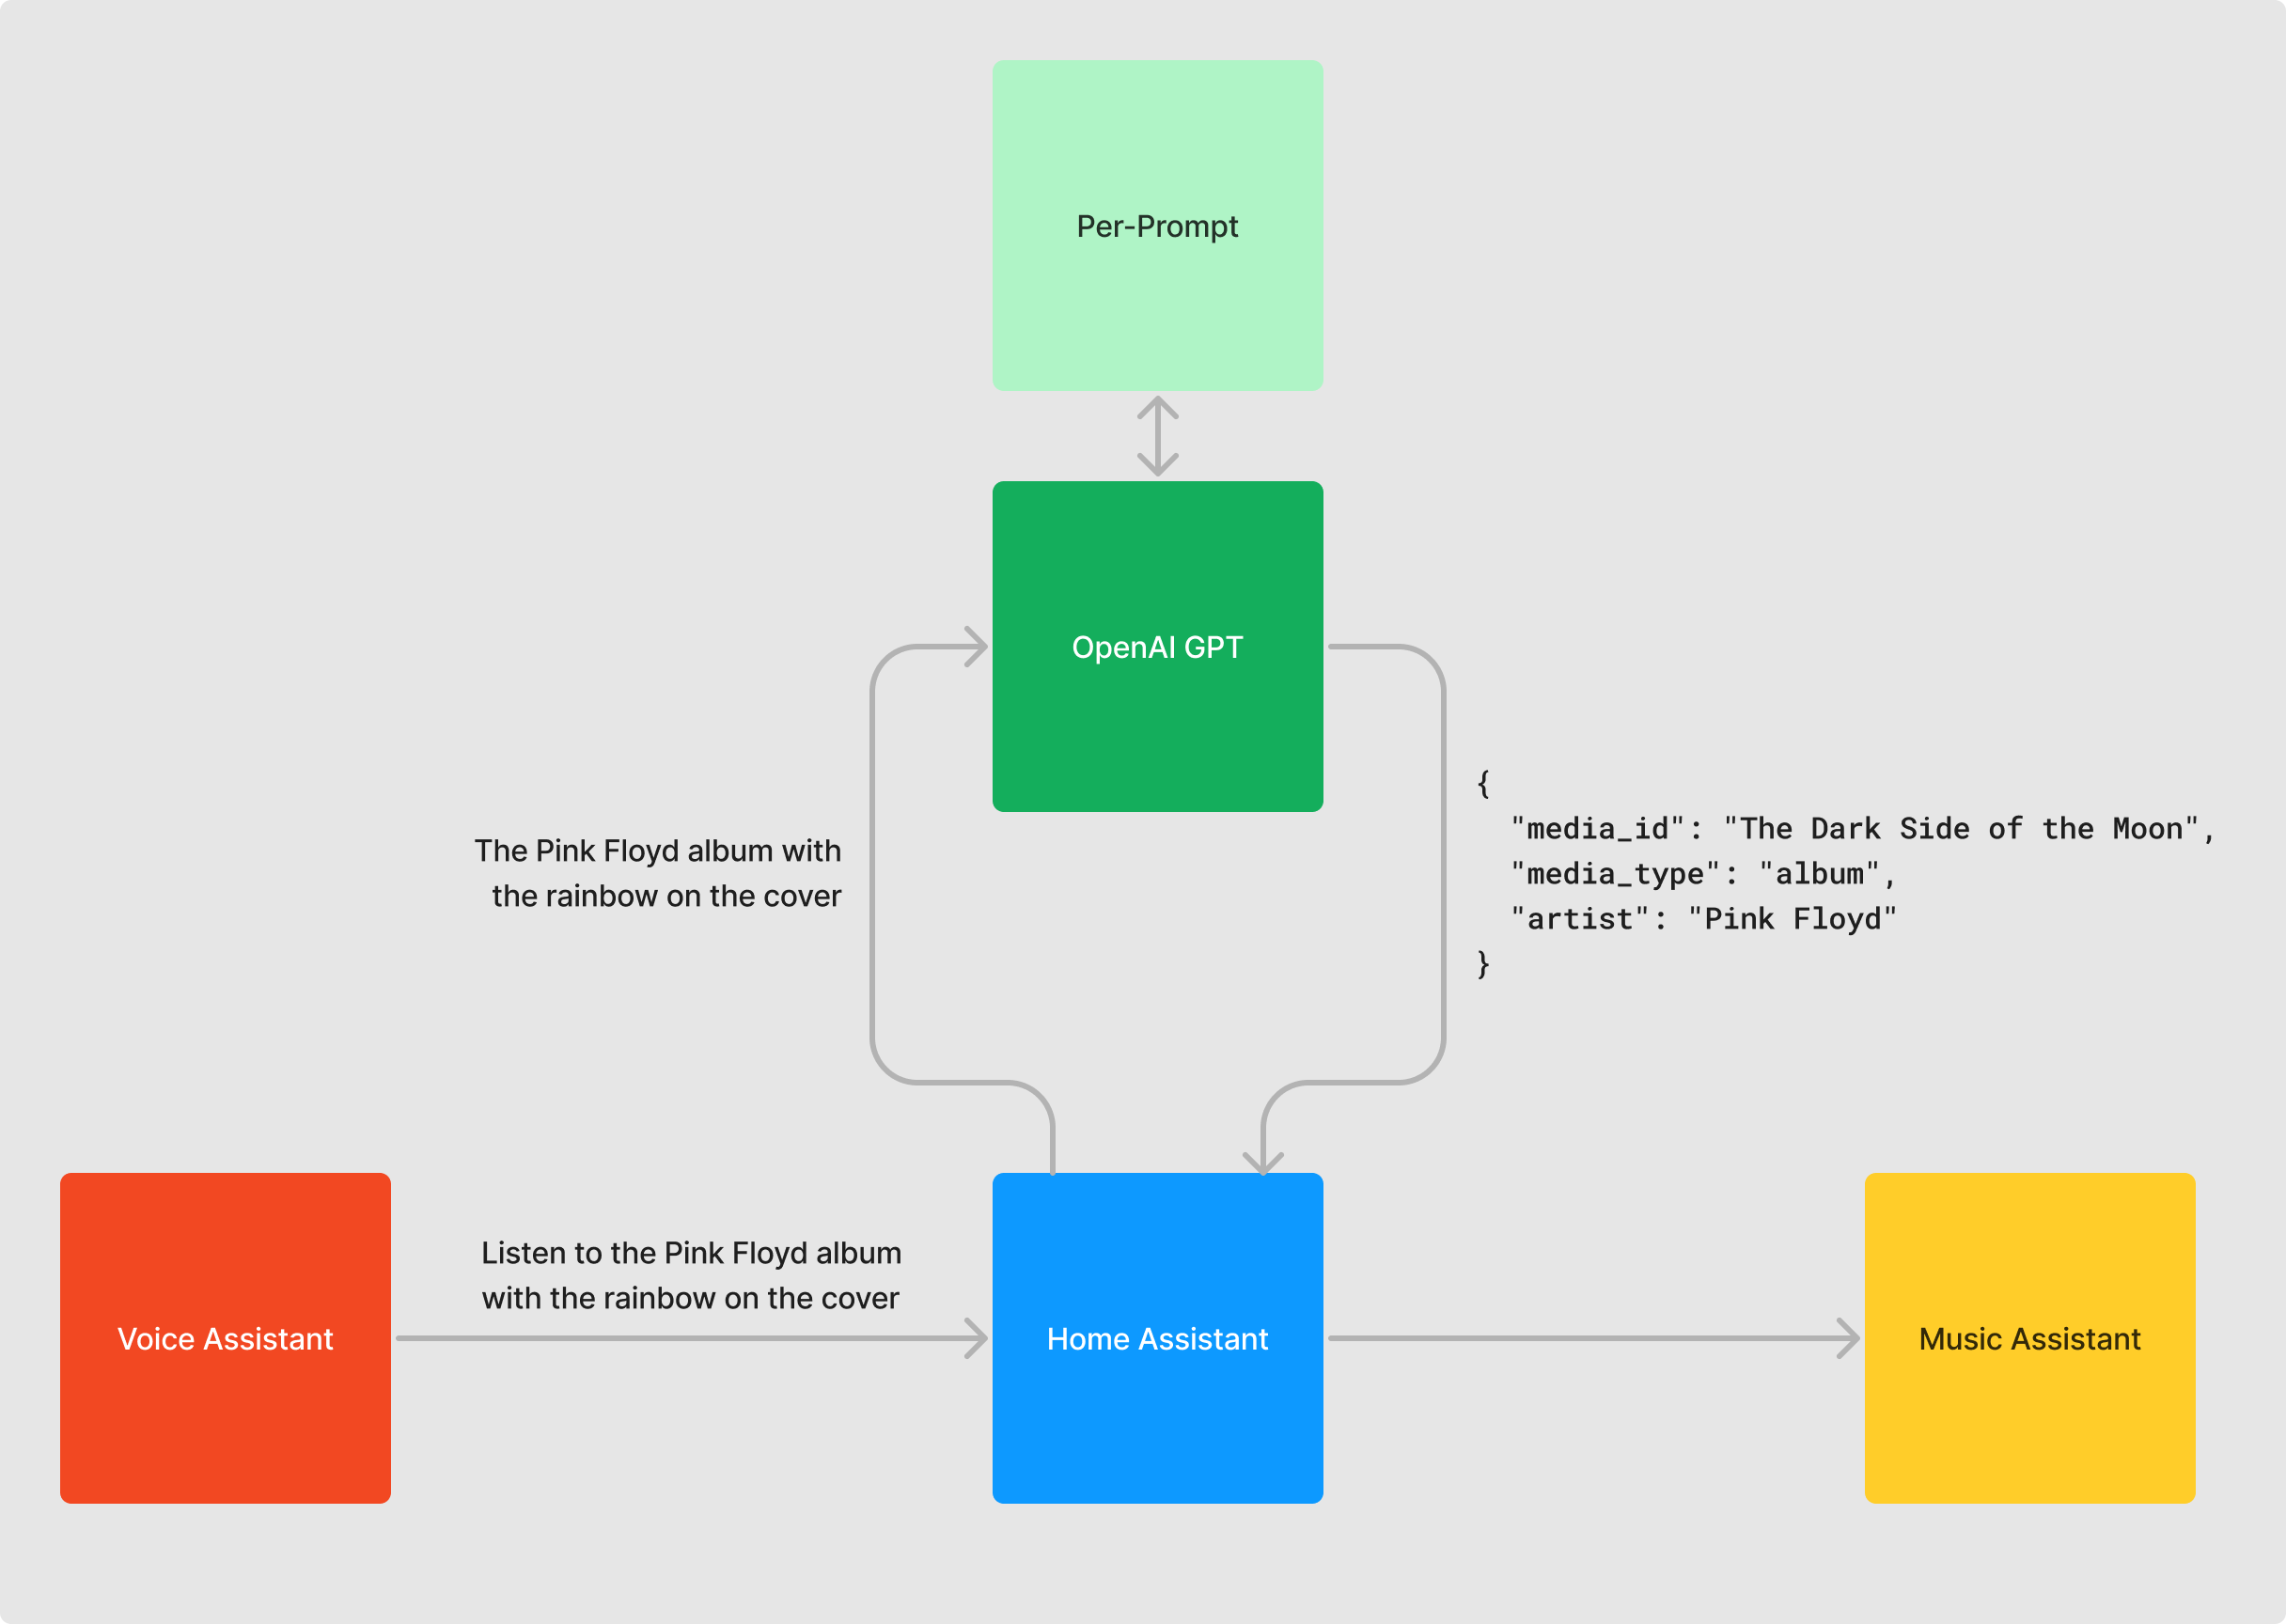
Before giving up, I decided to try a different approach. I tried to find a component that would do the "music part of the matching" for me. That way, I would only have to create a single intent in Home Assistant : play {query}, then I would pass {query} to that magical component and get in return a structured way representing what track, album, or artist it is so that I can use it with Music Assistant.
And I found exactly what I was looking for with OpenAI GPT.
Large Language Models (LLM) are super good at doing fuzzy tasks like transforming a line of text such as "Hells bells from AC/DC" into a structure model like
{
	"media_id": "Hells Bells",
	"media_type": "track",
	"artist": "AC/DC"
}
In case you are not familiar with LLM (even if this is not the place to explain in detail how they work, most notably because.. well I don't know), a LLM is an AI model that has been trained at guessing the next word after a certain block of text.
So if you give The mouse was eaten by the to an LLM, it will give you back cat.
Not very useful in itself, but as the input block of text can be pretty long, we usually use LLMs paired with the concept of pre-prompt.
A pre-prompt is a set of instructions you give to an LLM before giving your actual input. A simplified way of thinking about a pre-prompt is to see it as a block of text you add before your input. For example, if you want to create an AI assistant that translates English to French, you may create the very simple pre-prompt: You're a bot that helps me translate an english sentence into a french one. Here is the sentence:
Then the LLM does what it does best: Guessing the next word after a certain block of text, except this time, the block of text would look like this:
You're a bot that helps me translate an english sentence into a french one. Here is the sentence: LLM are pretty powerfull
And you get yourself an AI assistant that is pretty good at translating English into French.
(Note: Coming up with good prompts is now a skill in itself, a bit too trendy if you ask me, called prompt engineering, the art of creating good prompts)
Before showing you the prompt I used to translate things like The song used in the opening credit of the Narcos TV show into the correct structure data, let me show you how to integrate OpenAI LLM (called GPT, yes not ChatGPT, ChatGPT is the Chatbot product from OpenAI using their LLM GPT) into Home Assistant
Click here to integrate OpenAi into your Home Assistant:

All you need now is to input your OpenAI API key and you will be able to configure your OpenAI integration:
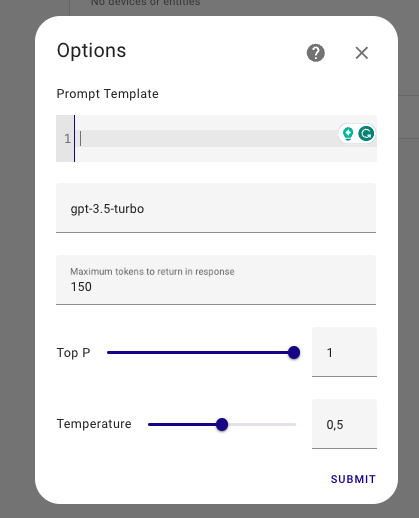
As you can see the configuration is pretty simple
- A prompt
- A GPT version
- A few parameters that I will overlook because they are not really useful for generating structured data
For the GPT version, keep gpt-3.5-turbo or use gpt-4 if you have access to it.
And here is the famous prompt. Warning: It's long
You are an AI process that transforms a music search query into a structured JSON.

Here is the structured JSON that I expect in response {"media_id":"name",  "media_type":"type", "artist":"name", "album":"name"}

"media_type" can be one of 3 different values: "track" if the search is about a specific track, "album" if the search is about an album, or "artist" if the search is about an artist.
media_type is mandatory

media_id is the most specific from track, album, and artist.
If the search is about a track: Then media_id is the track name.
If the search is about an album: Then media_id is the album name.
If the search is about an artist: Then media_id is the artist name.
media_id is mandatory.

If case it is needed, the fields "artist" and "album" can be used to further restrict the search.
For example, if the input is "Hells Bells by ACDC", then the output should be  {"media_id":"Hells Bells",  "media_type":"track", "artist":"AC/DC"}
"artist" and "album" are optional.

There can be 4 types of answers:
Just an artist like that {"media_id": "artist name", "media_type":"artist"}.
An album by an artist like that {"media_id": "album name", "media_type":"album", "artist": "artist name"}.
A track by an artist like that {"media_id":"track name", "media_type":"track", "artist": "artist name"}.
Just a track if the artist is not known like that {"media_id":"track name", "media_type":"track"}.

You must reply with only the JSON model, nothing before nor after because your response will be processed by a search component of a media listening service.

Note that the input query can be in French or English.

Here are a few examples of input with the expected output:
"Hells Bells by ACDC" > {"media_id":"Hells Bells",  "media_type":"track", "artist":"AC/DC"}.
"La discographie de Pink Floyd" >> {"media_id": "Pink Floyd", "media_type":"artist"}.
"The artist that composed the soundtrack of Inception" >> {"media_id": "Hans Zimmer", "media_type":"artist"}.
Once the OpenAI integration is configured on Home Assistant, let's take a small detour to test what we just created.
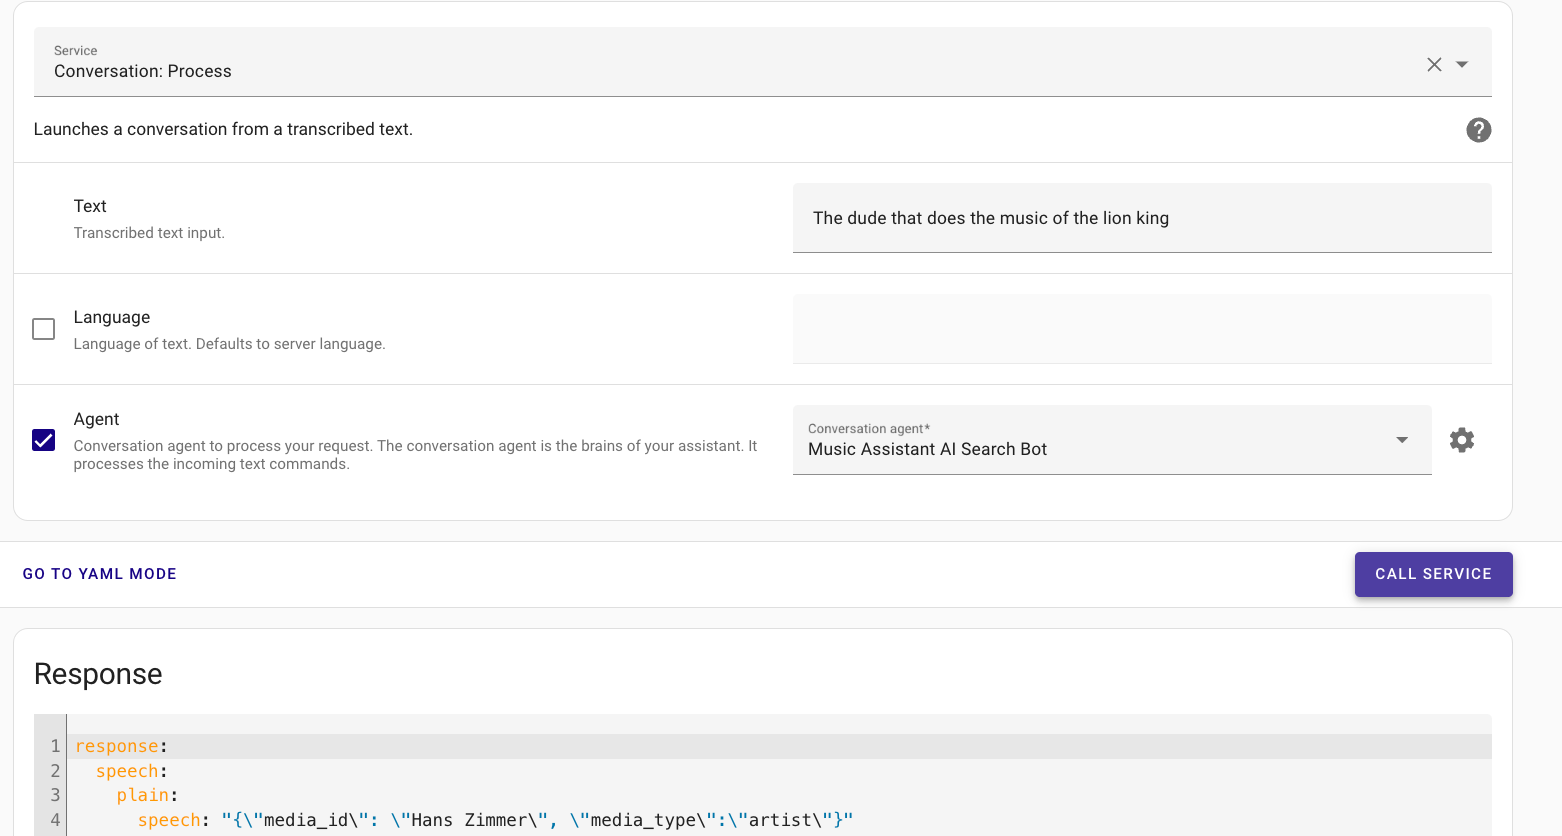
In the developer tools, you can test the service called conversation.process. Just click here to test it:

Select your OpenAi integration and write some input text. Click on Call service and you should see the power of LLMs ☺️
BTW, A simpler way to test this, but completely optional is to create a separate voice assistant using this conversation agent.
Go to Settings > Voice Assistants by clicking here:

Click on Add Assistant and use your openAi integration as a Conversation Agent.
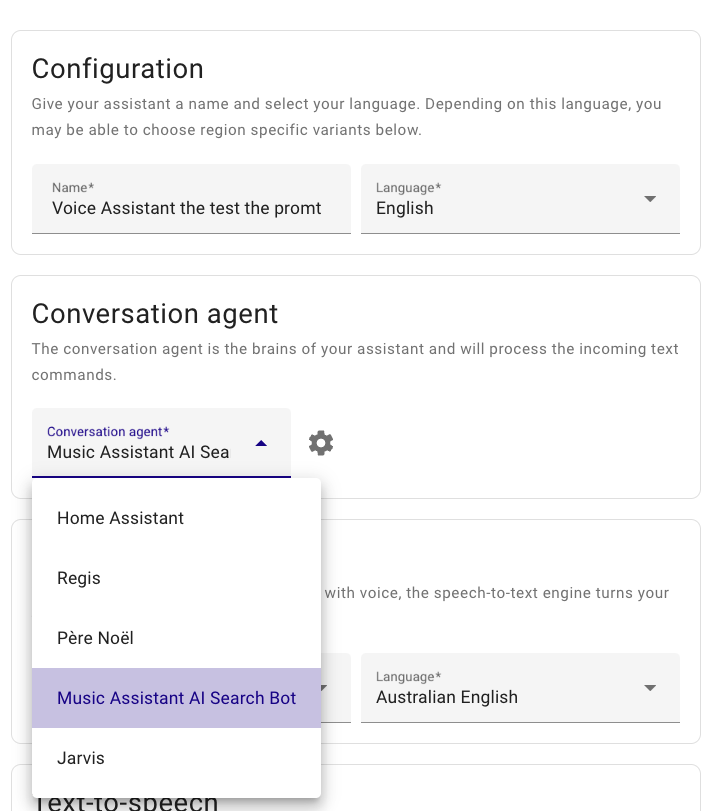
Nothing else matters on this screen as we will only use this voice assistant to test the prompt.
You can now converse with this voice assistant to test your prompt
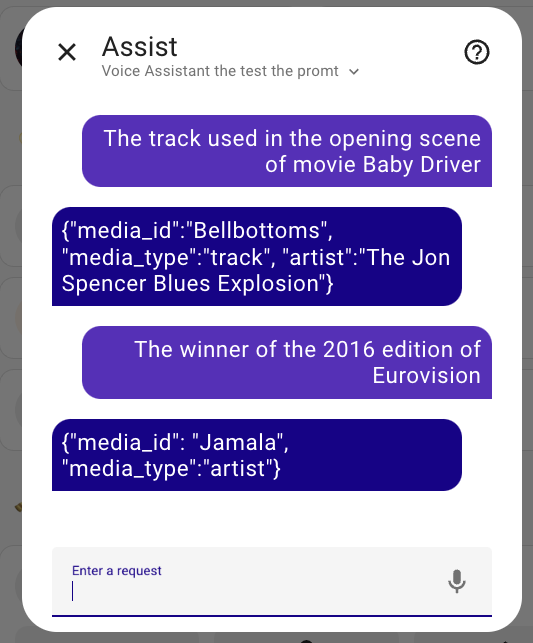
Putting everything together
Because we clarified all the building blocks needed, putting everything together is actually very simple now.
We are going to create an automation, that matches a certain sentence, passes the query to OpenAI, and then passes the OpenAI response to Music Assistant.
And the heavy lifting has been done for you, you can just use this blueprint:

Conclusion
I hope you learned something today. Contact me if you use the blueprint and you like it!
AI is a touchy topic, very trendy, I feel everyone is putting AI everywhere without a concrete reason. I enjoy that particular personal project because it shows AI solving an actual problem I faced.
Peace!
JLo